
Mug rug sewing is one of those hobbies that sounds small, simple and almost too modest to get excited about. Then you make one, put your favourite mug on it, add a biscuit, and suddenly it makes complete sense.
A mug rug sits somewhere between a coaster and a tiny quilt. It protects your table, adds colour to your home and gives you a quick sewing project that feels useful straight away.
Better still, you do not need years of sewing experience to make one. You do not need a huge fabric stash either. In fact, this is exactly the sort of project that works beautifully with floral scraps, gingham leftovers, old cotton pieces and those little offcuts you keep because they are “too pretty to throw away”.
If you like the cosy, slightly nostalgic look of a grandmother’s kitchen, a vintage-style mug rug offers a lovely way to bring that feeling into your own home. It feels handmade, homely and practical, yet it also gives beginners a gentle introduction to patchwork and quilting.
So, if you want a creative project you can start this weekend, mug rug sewing is a brilliant place to begin.
Mug Rug Sewing At A Glance
What is it? A simple sewing and quilting project that creates a small fabric mat for your mug and snack.
Skill level: Beginner
Typical cost: Under £15 if you already own basic sewing supplies.
Time needed: Around 1–2 hours
Best for: Anyone who enjoys sewing, quilting, patchwork or practical handmade crafts.
What Is A Mug Rug?
A mug rug is a small fabric mat designed to hold a cup, mug or glass, usually with enough extra space for a biscuit, cake slice or small snack.
Unlike a standard coaster, it gives you more room. Unlike a placemat, it does not take over the table. That makes it perfect for a desk, bedside table, armchair tray, craft room or kitchen corner.
However, mug rugs have become popular for more than practical reasons. Many makers enjoy them because they offer the pleasure of quilting without the scale of a full quilt. You still cut fabric, layer pieces, sew seams and add quilting stitches, but you work on a small, friendly project that feels manageable from the start.
That is why mug rugs suit beginners so well. They let you practise useful sewing skills without committing to weeks of work.
Why Beginners Love Mug Rug Sewing
🧵 Quick To Finish
You can often finish a simple mug rug in one afternoon, which makes it ideal if you want a satisfying result without a long project.
♻️ Brilliant For Scraps
Small fabric pieces suddenly become useful. Floral scraps, gingham strips and leftover cottons all work beautifully.
🎁 Easy To Gift
A handmade mug rug makes a thoughtful little present, especially when paired with tea, coffee or homemade biscuits.
☕ Useful Every Day
Unlike some craft projects that sit in a drawer, a mug rug earns its place on your table straight away.
Why Mug Rugs Feel So Cosy
Part of the charm comes from scale. A mug rug feels personal because it belongs to one small moment in the day.
Morning coffee. Afternoon tea. A quiet reading break. A few minutes at your desk. These little routines already matter, and a handmade mug rug makes them feel warmer.
There is also something nostalgic about scrap sewing. Many older quilts came from practical making rather than perfect design. People used what they had. They combined fabrics from worn clothing, household cottons and leftover pieces. As a result, those quilts often carried memory, usefulness and character.
A scrappy mug rug gives a nod to that tradition. It takes small pieces and turns them into something comforting.
If you enjoy creative hobbies with a practical finish, you may also like our guide to creative hobbies for adults, which explores more hands-on projects worth trying.
The Easiest Scrappy Mug Rug For Beginners
This beginner project uses basic straight stitches and simple fabric strips. It also embraces slightly imperfect edges, which helps create that charming vintage feel.
You can make the finished mug rug around 6 x 9 inches. That gives enough space for a mug and a small treat without making the project fiddly.
Tools And Supplies
Your Mug Rug Starter Kit
One of the reasons mug rug sewing appeals to beginners is that you probably already own most of what you need. A few fabric scraps, basic sewing supplies and a free afternoon are enough to get started.
Floral cottons, gingham and faded vintage-style prints help create the cosy cottage look that makes mug rugs so charming.
A small piece of backing fabric and matching quilt batting give the mug rug structure and softness.
Fabric scissors, pins, thread and a ruler will handle almost everything this project requires.
A basic straight stitch is all you need. Hand sewing works too if you prefer a slower pace.
Many beginners underestimate how much pressing improves a project. A quick press after each seam helps the mug rug look flatter, neater and far more professional.
🧵 Recommended Beginner Sewing Kit
If you’re starting from scratch, one of the biggest frustrations is discovering you need several different tools before you can begin. A combined quilting starter kit solves that problem neatly.
The Rotary Cutter Set Quilting Kit includes a 45mm rotary cutter, spare blades, a self-healing cutting mat, an acrylic ruler, sewing clips, and scissors. As a result, it covers most of the equipment needed for mug rug sewing, patchwork projects and beginner quilting. 👉 View the Rotary Cutter Quilting Kit on Amazon
Why we like it: Rather than buying tools individually, beginners can get everything they need in one kit and start sewing straight away.
How To Make A Mug Rug Step By Step
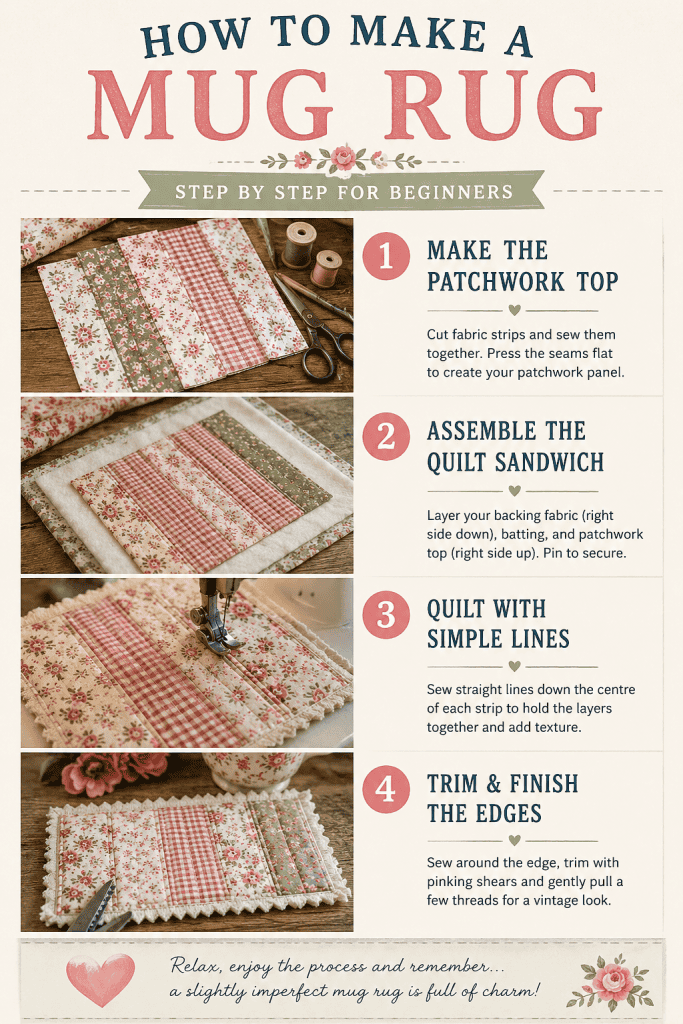
Step 1: Make The Patchwork Top
Start by cutting four fabric strips. Aim for each strip to measure around 2.5 inches wide by 6.5 inches long.
Choose fabrics that look pleasing together rather than worrying about a perfect match. A soft floral next to gingham usually works well. Cream cotton, faded pink, sage green, pale blue and traditional calico prints also create a lovely vintage effect.
Place two strips right sides together, then sew down one long edge using a straight stitch. Use the edge of your presser foot as a simple guide.
Next, open the strips and press the seam flat with your iron. Continue adding strips until you have one small rectangular patchwork panel.
At this point, the project already starts to feel like a miniature quilt.
Step 2: Assemble The Quilt Sandwich
Place your backing fabric face down on your work surface.
Then place the cotton batting directly on top.
Finally, add your patchwork top face up.
Smooth the layers with your hands and pin through all three layers in the corners. You can also add a pin in the centre if the fabric shifts.
This layered arrangement is often called a quilt sandwich. The name sounds informal, but the method sits at the heart of quilting.
Step 3: Quilt With Simple Lines
Now sew straight lines down the mug rug to hold the layers together.
The easiest method involves sewing one line down the centre of each fabric strip. This keeps the project simple and gives the finished mug rug a neat handmade look.
Do not worry if the lines wobble slightly. In fact, small imperfections can help the piece feel more authentic. A mug rug does not need factory-perfect stitching. It needs charm.
Once you finish quilting, trim away loose threads and tidy any uneven batting around the sides.
Step 4: Create The Frayed Vintage Edge
To finish, sew a line around the outside of the mug rug about a quarter of an inch in from the edge.
Then trim the outer edge with pinking shears if you have them. If not, use standard fabric scissors and gently tease a few threads loose with your fingers.
After washing, the edge will soften and fray slightly. This gives the mug rug a relaxed, vintage-inspired finish that suits the scrappy style beautifully.
Beginner Tip: Don’t Chase Perfection
A slightly uneven line, a mismatched fabric strip or a soft frayed edge can make a mug rug look more personal. Therefore, relax into the process and let the project feel handmade.
This is a lovely first sewing project because it forgives small mistakes and still produces something useful.
How To Choose Fabrics For A Vintage Look
The easiest way to create a cosy vintage look is to choose fabrics that feel soft rather than bold.
Small floral prints work especially well because they echo traditional patchwork. Gingham adds a cheerful kitchen feel, while plain cream or natural linen gives the design breathing space.
Try not to overthink the colours. Instead, place your fabric scraps together and trust your eye. If the pieces remind you of old tablecloths, cottage kitchens, faded quilts or tea room curtains, you are probably heading in the right direction.
However, contrast still helps. A mug rug made entirely from busy prints can look muddled. So, add one calmer fabric to give the eye somewhere to rest.
🌸 Recommended Vintage Fabric Bundle
The fabrics you choose have a huge impact on the finished look of a mug rug. If you’re aiming for a cosy cottage style or vintage-inspired patchwork feel, soft florals and gentle colours work beautifully.
The ‘Escape to the Country’ Fat Quarter Bundle includes six coordinating cotton fabrics in cream, pink and green tones. The colours complement each other perfectly, which removes the guesswork for beginners and helps create a traditional patchwork appearance.
👉 View the Escape to the Country Fabric Bundle on Amazon
Why we like it: The fabrics already work together, making it easy to create a charming vintage-style mug rug without spending ages choosing colours and patterns.
What Can You Do With Finished Mug Rugs?
A mug rug may begin as a beginner sewing project, but it can quickly become something you make again and again.
If you sell handmade items, mug rugs can make appealing small products.
Lovely Ways To Use Your Finished Mug Rug
A handmade mug rug may be small, but it quickly earns its place around the home. Once you make one, you’ll probably start thinking of excuses to make a few more.
Keep one beside your favourite chair, desk or bedside table to make an ordinary cuppa feel a little more special.
Pair one with a pretty mug, tea bags, coffee sachets or homemade biscuits for a simple gift that feels personal.
Use soft florals for spring, warm checks for autumn or festive fabrics for cosy Christmas corners.
If you sell handmade items, mug rugs make appealing small products because they are useful, affordable and easy to display.
That is part of the appeal. A mug rug starts as a small sewing project, yet it can become a gift, a seasonal decoration, a craft stall item or simply a cosy part of your everyday routine.
If you plan to sell or share your finished projects online, our guide to how to photograph handmade items will help you make your sewing look brighter, clearer and more appealing.
Mug Rug Sewing FAQs
Beginner Questions About Mug Rugs
How long does mug rug sewing take?
Most beginners can finish a simple mug rug in one to two hours, especially with a sewing machine.
Can I sew a mug rug by hand?
Yes. Hand sewing takes longer, but it can suit the slow, cosy feel of the project beautifully.
Can I wash a mug rug?
Yes. Cotton fabric and batting usually wash well. A gentle wash can also soften the frayed edge.
What size should a mug rug be?
Many mug rugs measure around 6 x 9 inches, although you can make yours larger or smaller to suit your table.
Why Mug Rugs Often Lead To Bigger Sewing Projects
Mug rug sewing can become surprisingly addictive.
Once you make one, you start seeing possibilities everywhere. A fabric scrap suggests another colour scheme. A small floral print inspires a cottage-style version. A festive fabric makes you think about Christmas gifts.
Before long, one mug rug becomes a pair. Then a seasonal set. Then perhaps a table runner. Eventually, a full quilt no longer feels quite so impossible.
That gentle progression explains why small sewing projects matter. They build confidence quietly. They teach useful skills without pressure. They also remind beginners that creativity grows through doing, not through waiting until you feel “good enough”.
For more information about quilting traditions, guilds and resources in the UK, visit The Quilters’ Guild.
Final Thoughts
Mug rug sewing proves that a hobby does not need to feel grand to feel worthwhile.
With a few fabric scraps, basic stitches and a little time, you can create something charming, practical and personal. You can use it every day, give it as a gift or make another one in completely different colours.
Most importantly, this project gives beginners a friendly way into sewing and quilting.
It does not demand perfection. It does not need expensive supplies. It simply invites you to sit down, stitch a few pieces together and enjoy the quiet satisfaction of making something useful with your own hands.
Pair your finished mug rug with a favourite mug, a homemade scone or a quiet five minutes in the afternoon.
Sometimes, that is exactly what a good hobby should give you.
Affiliate Disclosure: HobbyIdeas.co.uk participates in the Amazon Associates Programme. This means we may earn a small commission if you purchase through links on this page, at no additional cost to you. We only recommend products that are relevant to the hobby or activity being discussed.