
There is something oddly satisfying about Needle felting for beginners, turning a fluffy ball of wool into a fox, a sheep, a mushroom, or even a miniature version of your dog.
At first glance, needle felting looks almost magical. A few minutes earlier you have a handful of loose fibres. Then, somehow, those fibres become a recognisable shape with character, texture and personality.
That transformation explains why so many people fall in love with the hobby.
Needle felting sits somewhere between sculpture, drawing and craft. It requires very little space, the equipment costs surprisingly little, and yet the results can look incredibly professional. Furthermore, beginners often discover they can create something attractive far sooner than they expected.
Whether you want a relaxing creative pastime, a way to make handmade gifts, or perhaps even a small craft business, needle felting offers an enjoyable route into the world of fibre art.
What Exactly Is Needle Felting?
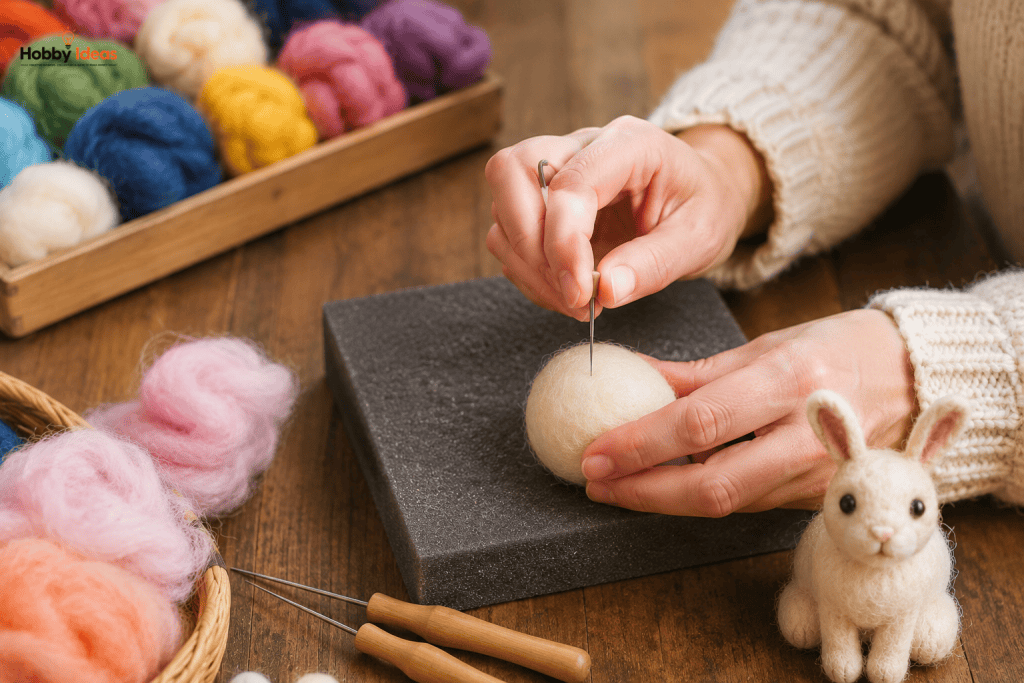
In simple terms, needle felting is the art of turning loose wool into solid shapes using a special barbed needle.
Each time the needle passes through the wool, tiny barbs catch the fibres and tangle them together. Keep repeating the process and the soft wool gradually becomes firm enough to hold its shape.
That shape can be almost anything.
Some people make tiny woodland animals. Others create realistic wildlife sculptures, festive decorations, brooches, framed artwork or personalised gifts. Once you understand the basic technique, the possibilities are surprisingly wide.
The reason so many beginners enjoy needle felting is that it feels approachable from day one. You do not need to draw, paint or have any traditional artistic skills. Instead, you build shapes slowly with your hands, adding wool where you need it and refining the form as you go.
Start with a simple mushroom or heart and, before long, you may find yourself attempting foxes, sheep, owls or even miniature pet portraits.
That combination of simplicity, creativity and visible progress is what makes needle felting such an enjoyable hobby to learn.
Needle Felting for Beginners: Why People Get Hooked
- Low start-up costs
- Very little workspace required
- Relaxing repetitive movements
- Visible progress from the first session
- Suitable for almost any age
- Projects can be completed in a few hours
- Ideal for handmade gifts and decorations
- Endless creative possibilities
Another attraction lies in the materials themselves.
Wool feels warm, natural and tactile. There is something comforting about working with a traditional material that has been used for thousands of years. Modern craft suppliers now offer hundreds of colours, allowing artists to build realistic animals, vibrant fantasy figures and detailed decorative pieces.
However, beginners often worry that they need expensive equipment.
Thankfully, that is rarely the case.
A basic starter kit generally contains everything needed for the first few projects. Most include felting needles, coloured wool, finger guards and a foam working surface. After that, additional colours can be added gradually as your confidence grows.
If you already enjoy creative hobbies, you may also find inspiration in our guide to Gelli plate printing, another hands-on craft that encourages experimentation and creativity.
Despite its simplicity, needle felting does involve a small learning curve.
The biggest challenge usually comes from expectations.
Many newcomers imagine they will create a museum-quality fox on their first attempt. Then reality arrives in the form of a slightly lopsided creature with uneven ears and a puzzled expression.
Yet that is part of the charm.
Every experienced needle felter has a collection of early creations hidden somewhere. Those imperfect projects often become treasured reminders of how far their skills have developed.
Fortunately, improvement comes quickly because every project teaches something new.
Ready To Experiment?
One of the joys of needle felting is experimenting with colour combinations. The Namner 36 Colour Needle Felting Wool Set provides a wide range of shades for creating animals, flowers, mushrooms and seasonal decorations. Having plenty of colours available often inspires new project ideas and encourages creativity.
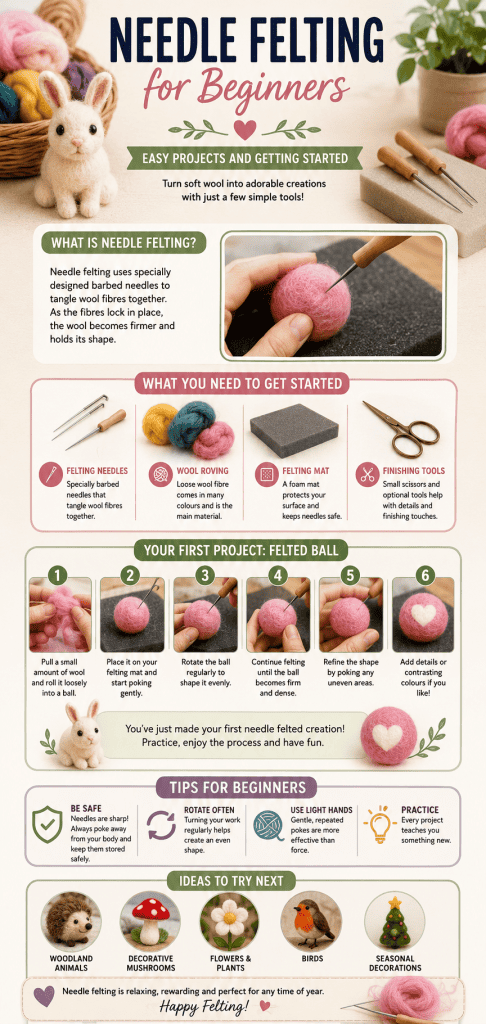
What You Actually Need to Get Started
The good news is that needle felting has a very low barrier to entry. You do not need a dedicated craft room or a cupboard full of expensive equipment. In fact, a handful of basic tools will get you started.
🪡 Felting Needles
The heart of the hobby. These special barbed needles tangle and compress wool fibres as you work, gradually transforming loose wool into solid shapes.
🐑 Wool Roving
Loose wool fibres available in an almost endless range of colours. This is your raw material and the foundation of every project.
🧽 Felting Mat
Usually made from dense foam or wool. It protects your work surface and helps prevent needles from snapping during use.
🧤 Finger Protectors
Not essential, but highly recommended. Every needle felter eventually pokes a finger, although beginners tend to do it more often.
💡 Good Lighting
Strong lighting makes shaping, blending colours and spotting uneven areas much easier, especially when working on fine details.
⏳ A Little Patience
It may not come in a starter kit, yet it is one of the most useful tools you can bring. Slow, steady work nearly always produces the best results.
With these basics in place, you’re ready to turn a handful of fluffy wool into something surprisingly impressive.
Recommended for Beginners:
If you would like to start needle felting without hunting down individual supplies, the dipeer Needle Felting Starter Kit includes needles, a felting mat, wooden holders and useful accessories in one package. For complete beginners, a kit like this removes much of the guesswork and allows you to focus on learning the craft itself.
How Needle Felting Works in Practice
Once you sit down with your materials, the process quickly begins to make sense.
You start by pulling off a small amount of wool and loosely shaping it with your hands.
Next, you place the wool on the felting mat and begin stabbing repeatedly with the felting needle. The movement sounds dramatic, yet it soon becomes rhythmic and relaxing.
As the fibres compress, the wool shrinks and hardens.
Gradually you rotate the piece, working from different angles to create an even shape. Additional wool can then be attached to form legs, ears, tails or decorative features.
This gradual building process allows projects to evolve naturally.
Rather than carving material away, as a woodworker might, a needle felter builds forms by adding and shaping fibres. Consequently, mistakes are often easier to correct.
If an area looks too thin, simply add more wool.
If a feature appears oversized, continue felting until it becomes smaller and firmer.
Many enthusiasts compare the experience to sculpting with clouds.
That description sounds strange until you try it yourself.
Creating Your First Needle Felted Project
For your first project, keep things simple.
A small mushroom, heart, pumpkin or basic animal head will teach you the core techniques without becoming frustrating.
Before you start, gather
Step 1: Make a Basic Shape
Tear off a small handful of wool and roll it loosely between your hands into a ball or oval shape.
Don’t worry about making it perfect. At this stage it only needs to resemble the general shape you want.
Step 2: Start Felting
Place the wool on your mat and begin poking it with the felting needle.
Use straight up-and-down movements and avoid bending the needle, as this can cause it to snap.
Turn the wool regularly so all sides receive equal attention.
After a few minutes the fibres will begin locking together and the shape will feel noticeably firmer.
Step 3: Refine the Shape
Once the wool starts holding together, continue felting any areas that look uneven.
If the piece needs more volume, simply add another small piece of wool and felt it into place.
This is one of the great advantages of needle felting. You can keep adjusting the shape as you work.
Step 4: Add Features
If you are making a mushroom, create a separate wool ball for the cap.
If you are making an animal, felt the ears separately.
Position the new piece where you want it and repeatedly stab through both sections until they become firmly attached.
Step 5: Firm Everything Up
Walk around the entire project and continue felting any soft areas.
A beginner’s project often looks finished before it actually is.
If the wool still feels squishy when squeezed gently, spend a few more minutes felting.
Step 6: Add Final Details
Once the basic shape feels firm, you can begin experimenting with details.
Add different coloured wool, create texture, build cheeks, shape ears or define features.
This is where your project starts developing its own character.
If you would like to explore the wider world of contemporary crafts and makers, the Craft Council provides inspiration, exhibitions and resources covering a wide range of creative hobbies across the UK.
Needle Felting For Beginners FAQ
Needle Felting Questions Beginners Usually Ask
Is needle felting expensive?
No. Most beginners can start with a basic kit for less than many other craft hobbies. Wool also lasts well, so small projects do not need much material.
How long does it take to learn?
You can make simple shapes on your first day. However, detailed animals, faces and realistic pieces take practice, patience and a few wonky early attempts.
Can children do needle felting?
Older children can enjoy needle felting with close adult supervision. The needles feel small, but they are extremely sharp, so finger guards make sense.
What wool should beginners buy?
Merino and Corriedale both work well for beginners. Merino feels softer, while Corriedale often felts quickly and holds shape nicely.
Can needle felting become a business?
Yes. Many makers sell decorations, brooches, pet portraits, seasonal ornaments and commissioned pieces online or at craft fairs.
Do projects last?
Well-felted items can last for years when handled gently. Keep them dry, dust them lightly and avoid letting pets treat them as toys.
Common Beginner Mistakes
Using too much force: Let the needle do the work.
Expecting instant perfection: Every project teaches valuable skills.
Skipping finger guards: Most beginners eventually regret this decision.
Under-felting: Soft projects often need more work than you think.
Starting too ambitious: Small projects build confidence faster.
Final Thoughts on Needle Felting For Beginners
Needle felting combines creativity, relaxation and practicality in a way few hobbies manage.
It does not demand a dedicated workshop, expensive machinery or years of training before producing satisfying results. Instead, it offers a straightforward path into making something tangible with your own hands.
Perhaps that explains why so many people start with a simple felted mushroom and eventually find themselves creating entire collections of animals, decorations and artwork.
The hobby rewards patience without feeling difficult. It encourages creativity without requiring formal artistic skills. Most importantly, it remains enjoyable whether you spend twenty minutes or an entire weekend working on a project.
In a world filled with screens, notifications and distractions, there is something wonderfully refreshing about sitting quietly with a handful of wool and creating something unique.
You may begin with a small ball of wool.
However, don’t be surprised if you soon discover a hobby that keeps you happily occupied for years.
Affiliate Disclosure: HobbyIdeas may earn a small commission from qualifying purchases made through affiliate links. This helps support the website at no additional cost to you. We only recommend products and resources that we believe hobby enthusiasts may find useful.