
Learning how to photograph handmade items can completely change how your crafts, artwork, products, and creative projects appear online. A beautiful handmade piece can lose its charm in a dull photo. However, a simple item can suddenly look polished, desirable, and ready to sell when you use good light, careful staging, and a clean background.
Fortunately, you do not need a professional studio. You do not even need an expensive camera. Instead, you need a few reliable habits, a little patience, and a clear idea of what buyers, readers, or followers need to see.
Whether you sell on Etsy, Folksy, your own website, craft fairs, Instagram, or a small online shop, your photos do a lot of quiet work. They show texture. They suggest quality. They build trust. More importantly, they help someone imagine the item in their own home, wardrobe, craft room, or gift list.
Why Good Handmade Product Photos Matter: The Reason to Learn How To Photograph Handmade Items Properly.
Handmade items often carry small details that mass-produced products rarely have. A hand-stitched edge, a brushed glaze, a carved surface, a soft linen texture, or a tiny colour variation can make the item feel special. Therefore, your photographs need to show those details clearly.
Online shoppers cannot pick up your product. They cannot feel the fabric, tilt the pottery, open the box, or turn the artwork towards the light. As a result, your photographs must answer those questions for them.
Good images also create confidence. A clear, bright, well-composed photograph tells people that you care about your work. In addition, it makes your handmade item look more valuable without changing the item itself. Take your time, by learning how to photograph handmade items, the rewards will eventually be greater than the effort
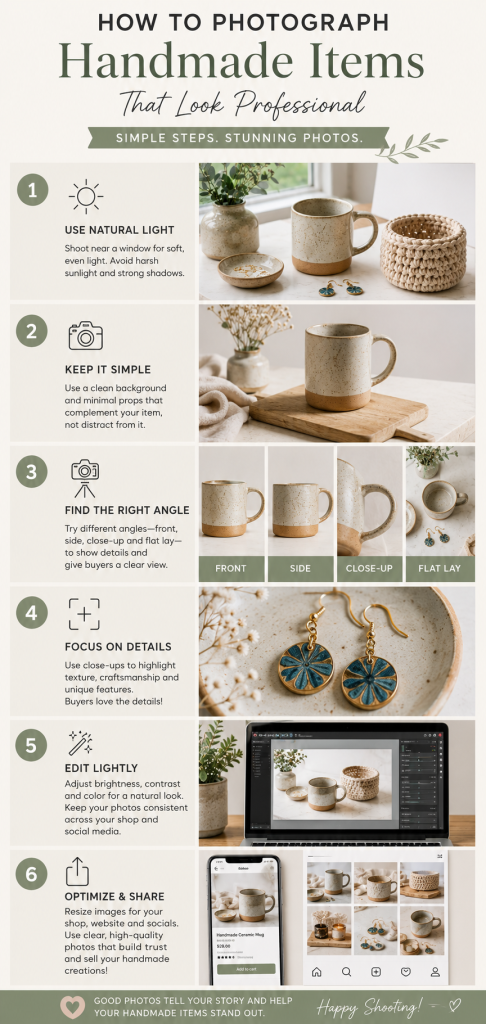
Start with Natural Light
Natural light gives handmade items a softer, more believable look than harsh indoor lighting. So, begin near a window rather than under a ceiling bulb. Bright but indirect daylight usually works best, especially for jewellery, ceramics, textiles, candles, cards, prints, and small craft pieces.
A north-facing window often gives gentle light throughout the day. However, any window can work if the sun does not shine directly onto the item. Direct sun can create sharp shadows, blown-out highlights, and colours that feel too harsh.
Instead, place your item close to the window and turn it slowly until the light falls across it nicely. Then, look at the shadows. Soft shadows add depth, while dark heavy shadows hide detail.
Simple Light Fixes That Work
If one side looks too dark, place a piece of white card opposite the window. This card bounces light back onto the shadow side. As a result, the product looks brighter without losing its natural shape.
If the light feels too strong, hang a thin white curtain, baking parchment, or a sheer cloth over the window. This diffuses the light and softens the whole scene. Meanwhile, avoid yellow lamps, mixed lighting, and flash unless you know exactly how to control them.
If you want even more control over your lighting, a collapsible reflector can make a surprising difference. The NEEWER 43"/110cm Light Reflector Kit helps bounce natural light back onto your handmade items, reducing harsh shadows and bringing out textures, colours, and fine details. It folds down for storage, costs far less than studio lighting, and works particularly well for ceramics, jewellery, candles, textiles, and other handmade products.
Choose a Background That Helps the Item Shine
When you learn how to photograph handmade items, background choice matters almost as much as the item itself. A busy background can make a beautiful product look messy. However, a plain background can sometimes look too sterile if the item needs warmth.
For most handmade pieces, neutral backgrounds work well. Try white card, pale wood, linen fabric, stone-effect paper, a painted board, or a simple tabletop. These options give texture without stealing attention.
However, the best background depends on the product. Rustic candles may suit weathered wood. Modern jewellery may suit a smooth white surface. Colourful crochet may need a calm, pale backdrop. Meanwhile, dark ceramics can look stunning against warm natural fabric.
Backgrounds to Avoid
Avoid cluttered shelves, patterned carpets, crumpled bedding, kitchen worktops full of objects, and anything that makes the photo look rushed. In addition, avoid backgrounds that nearly match the product colour, because the item may disappear into the scene.
Instead, ask a simple question before you shoot: does this background make the item clearer, more attractive, and easier to understand?
The right backdrop can instantly make handmade products look more professional. If you regularly photograph crafts, jewellery, candles, ceramics, or artwork, a dedicated photography background saves time and creates a more consistent look. The White Floor Vinyl Photography Backdrop from Click Backdrops provides a clean, painted wooden-plank effect that works beautifully with many handmade items. As a result, you can create bright, magazine-style product photographs without having to hunt for suitable surfaces around the house.
Camera vs Phone: Which Should You Use When Learning How to Photograph Handmade Items?
You can take excellent handmade product photos with either a camera or a phone. Therefore, the best choice depends less on the device and more on how you use it.
A modern smartphone often works brilliantly for small products, social media images, blog photos, and online listings. Phones focus quickly, handle bright daylight well, and make editing simple. In addition, you can shoot, crop, brighten, resize, and upload from one device.
A dedicated camera gives you more control. It can capture sharper detail, handle depth of field better, and produce larger files for print or professional catalogues. However, it also adds extra steps, especially if you need to transfer images to a computer before editing.
Use Your Phone Well Before You Upgrade
Before buying new kit, get the basics right. Clean the lens. Tap to focus on the product. Hold the phone steady. Use the main rear camera rather than the selfie camera. Also, avoid digital zoom, because it can reduce quality.
Instead of zooming in, move closer carefully. If the item needs a close-up, take a separate detail shot. This approach keeps the main image clean while still showing craftsmanship.
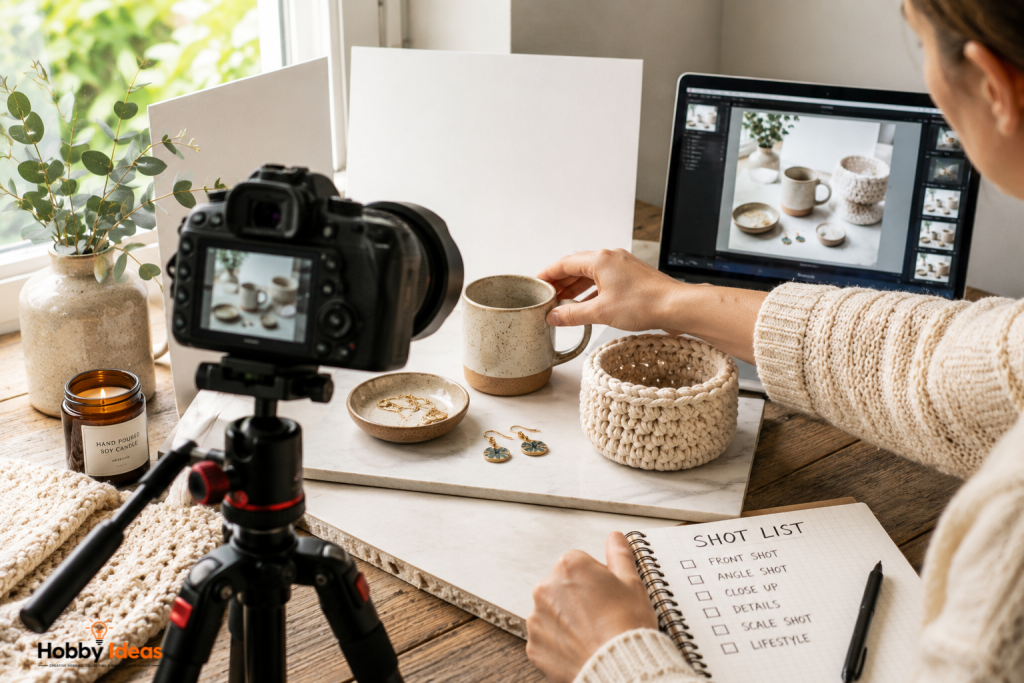
Plan the Photos Before You Start
A short shot list saves time. It also stops you from uploading five versions of almost the same image while missing the one angle buyers actually need.
For most handmade items, aim for a small set of useful photographs:
- A clean front-facing main image
- A slightly angled lifestyle image
- A close-up detail shot
- A scale shot beside a familiar object
- A packaging or gift-ready image, if relevant
- A back, inside, underside, or fastening shot, if needed
This approach works particularly well for makers who sell online. Moreover, it helps customers understand size, finish, colour, and use without asking extra questions.
Show Scale Clearly
Scale can confuse people online. A handmade bowl may look large in one photo and tiny in another. A pair of earrings may appear heavier than they really are. A print may look bigger than A4 if the frame fills the image.
Therefore, include at least one image that shows scale. You can place the item in a hand, beside a mug, on a shelf, near a notebook, or beside another everyday object. However, keep the comparison object simple and relevant.
If you sell handmade items, always include written measurements too. Photos help, but measurements remove doubt.
Use Styling Without Creating Confusion
Styling can make handmade items feel more desirable. A candle beside dried flowers, a ceramic mug near folded linen, or a handmade notebook beside a fountain pen can add mood and context. However, styling should support the item rather than compete with it.
Use props sparingly. Choose objects that match the story of the product. For example, a handmade soap may suit a towel, brush, or small dish. Meanwhile, a children’s craft item may suit brighter, playful styling.
Also, make it clear what the customer receives. If the props do not come with the product, your main listing image should avoid confusion. A styled image can follow later in the gallery.
Think Like a Magazine Stylist
Hobby photography becomes more enjoyable when you treat the scene like a small magazine feature. Instead of placing an item flat on a table and hoping for the best, build a tiny story around it.
For example, a handmade bookmark could sit inside an open book with a cup of tea nearby. A mosaic coaster could appear beneath a small glass vase. A knitted scarf could drape over a chair near a window. As a result, the photo suggests a lifestyle rather than just an object.
This approach also suits creative hobby content. If you enjoy making things, you may also enjoy our guide to practical hobby how-to guides.
Use Composition to Make Photos Feel Professional
Composition simply means how everything sits inside the frame. You do not need complicated rules, although a few classic techniques help.
First, leave breathing space around the item. A cramped image can feel tense and awkward. Secondly, keep lines straight, especially if your product sits against a wall, table edge, shelf, or frame. Thirdly, avoid placing every item dead centre unless the design needs symmetry.
The rule of thirds can help. Imagine the image divided into nine equal rectangles. Then, place the product or main detail near one of the crossing points. This often creates a more natural, editorial feel.
Try Different Angles
Different handmade items need different angles. Flat-lay photos work well for cards, prints, stationery, fabrics, craft kits, tools, and small accessories. A 45-degree angle suits mugs, bowls, candles, jars, and decorations. Straight-on images work well for wall art, framed prints, signs, and product packaging.
Take more images than you need. Then, choose the strongest ones later. Often, the best photo comes after you adjust the product by a few centimetres.
Keep Colours Accurate
Colour accuracy matters when people buy handmade items online. A blue glaze, cream yarn, olive fabric, or dusty pink print may look very different under poor light. Therefore, photograph products in consistent daylight and avoid heavy filters.
Most phones and cameras adjust colour automatically. However, they can struggle with strong backgrounds, mixed lighting, or very bright whites. If the image looks too yellow, too blue, or too grey, adjust the warmth slightly during editing.
For selling, your goal should not involve making the item look better than real life. Instead, aim to make it look like itself on a good day.
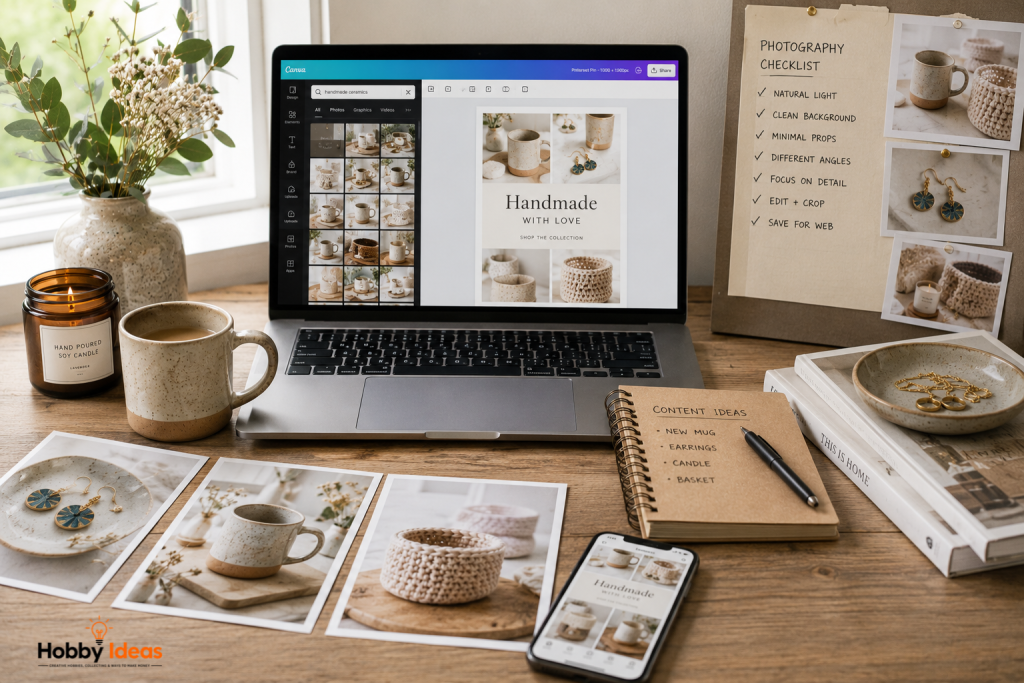
Editing Handmade Product Photos
Editing should improve clarity, not disguise the product. You can brighten shadows, crop the frame, correct colour, sharpen gently, and remove small distractions from the edge of the image. However, avoid changing the actual colour, texture, or finish of the handmade item.
Simple editing tools often work well. Your phone’s built-in editor can handle brightness, contrast, warmth, cropping, and straightening. Meanwhile, Canva can help you resize images, create blog graphics, prepare Pinterest pins, and design consistent product visuals.
If you need image dimensions for websites or social media, Canva’s resizing tools can make the process easier. You can also read Canva’s own guidance on product photography ideas and techniques.
Resize Images Before Uploading
Large image files can slow down a website. Therefore, resize your photos before uploading them to your shop, blog, or portfolio. A huge camera file may look sharp, but it can also make pages load slowly.
For websites, many product images work well at around 1200 pixels wide, depending on your theme and layout. Blog images may need different sizes. Social media platforms also crop images differently, so check the shape before posting.
Use descriptive filenames too. Instead of uploading IMG_4837.jpg, rename the file with useful words. For example, handmade-blue-ceramic-mug-window-light.jpg tells search engines and media libraries what the image shows.
How to Photograph Handmade Items for Different Crafts
Different crafts need slightly different treatment. So, adjust your setup to suit the material, shape, and finish.
Jewellery
Jewellery needs sharp focus and soft light. Use a plain background, reduce reflections, and include close-ups of clasps, stones, textures, and scale. Also, photograph earrings on a stand or card if they look confusing when flat.
Ceramics and Pottery
Ceramics often look best in angled light because the shadows reveal form. Show the inside, rim, base, glaze detail, and scale. If the surface shines, move the item slightly until reflections look soft rather than distracting.
Textiles and Crochet
Textiles need texture. Therefore, use side light, close-ups, and gentle folds. Show the fabric in use where possible, because scarves, cushions, blankets, bags, and garments often need lifestyle context.
Prints, Cards, and Paper Goods
Paper items need straight lines and accurate colour. Use flat-lays or straight-on shots. Also, keep the camera parallel to the artwork so the edges do not distort.
Candles and Home Fragrance
Candles suit warm lifestyle styling. However, keep labels readable and lids, jars, wax surfaces, and packaging clear. Add props carefully, especially if the scent has a seasonal theme.
A Simple Home Photography Setup
You can create a useful photography corner at home with very little equipment. Choose a table near a window. Add a white card reflector. Keep a few background boards nearby. Then, store small props in a box so you can style quickly.
A tripod also helps. It keeps the camera steady, especially in lower light. In addition, it helps you shoot consistent angles across a full product range.
If you photograph handmade items regularly, create a repeatable setup. This gives your shop, blog, or social media feed a more polished look. Moreover, it saves time because you do not need to reinvent the scene every time.
A sturdy tripod can also transform your results, especially when photographing handmade items in lower light. The JOILCAN 66-inch Camera Tripod works with both cameras and smartphones, making it a flexible choice for hobbyists and small business owners. Because it keeps your camera perfectly still, you can shoot sharper images, experiment with different angles, and maintain consistent framing across an entire product range.
Common Handmade Photography Mistakes
Most poor product photos come from a few simple mistakes. Fortunately, you can fix them quickly.
- Using yellow indoor lighting
- Forgetting to clean the camera lens
- Photographing against a cluttered background
- Using digital zoom instead of moving closer
- Editing colours too heavily
- Cropping the item too tightly
- Missing scale shots
- Showing too many props in the main photo
Once you notice these habits, your images improve quickly. Better still, your whole product range starts to look more consistent.
How to Photograph Handmade Items for Selling Online
If you want to sell your work, your photos need beauty and information. A pretty photo may attract attention. However, clear supporting images help someone decide whether to buy.
Start with the cleanest image as your main photo. Then, add lifestyle shots, close-ups, scale shots, and packaging images. Also, show any natural handmade variation. Buyers usually appreciate honesty, especially when handmade items differ slightly from one piece to another.
Think of your gallery as a quiet conversation. The first image says, “Look at this.” The next few images say, “Here is what it feels like, how big it is, how it works, and why it matters.”
Make Your Photos Feel Like Part of Your Brand
Consistent photography helps people recognise your work. You do not need every image to look identical. However, a shared mood, colour palette, background style, or lighting approach can make your handmade business feel more memorable.
For example, a natural craft brand might use linen, wood, plants, and soft daylight. A bold jewellery brand might use crisp white backgrounds and strong close-ups. A playful stationery brand might use brighter colours and cheerful props.
As your style develops, save your favourite photos and study them. Notice the background, light direction, crop, angle, and props. Then, repeat what works.
Quick Checklist Before You Shoot
- Clean the item and the camera lens
- Choose bright indirect daylight
- Use a simple background
- Check for clutter around the edges
- Take front, angled, close-up, scale, and lifestyle shots
- Keep colours natural
- Edit lightly
- Resize and rename files before uploading
Final Thoughts on How to Photograph Handmade Items
Learning how to photograph handmade items does not mean chasing perfection. Instead, it means showing your work clearly, attractively, and honestly. Good photos help people understand the care, texture, and personality behind each piece.
Start with one window, one simple background, and one item. Then, practise small changes. Move the product. Shift the light. Try another angle. Add one prop, then remove it if it distracts. Over time, your eye improves.
Most importantly, let the handmade quality remain visible. A slightly uneven edge, a brush mark, a handwoven texture, or a natural glaze variation can add charm. Therefore, photograph your work with care, but do not remove the character that makes it yours.
Disclosure: Some links on HobbyIdeas are affiliate links. If you buy through these links, we may earn a small commission at no extra cost to you. We only recommend products we believe are useful, relevant, and good value for hobbyists.