


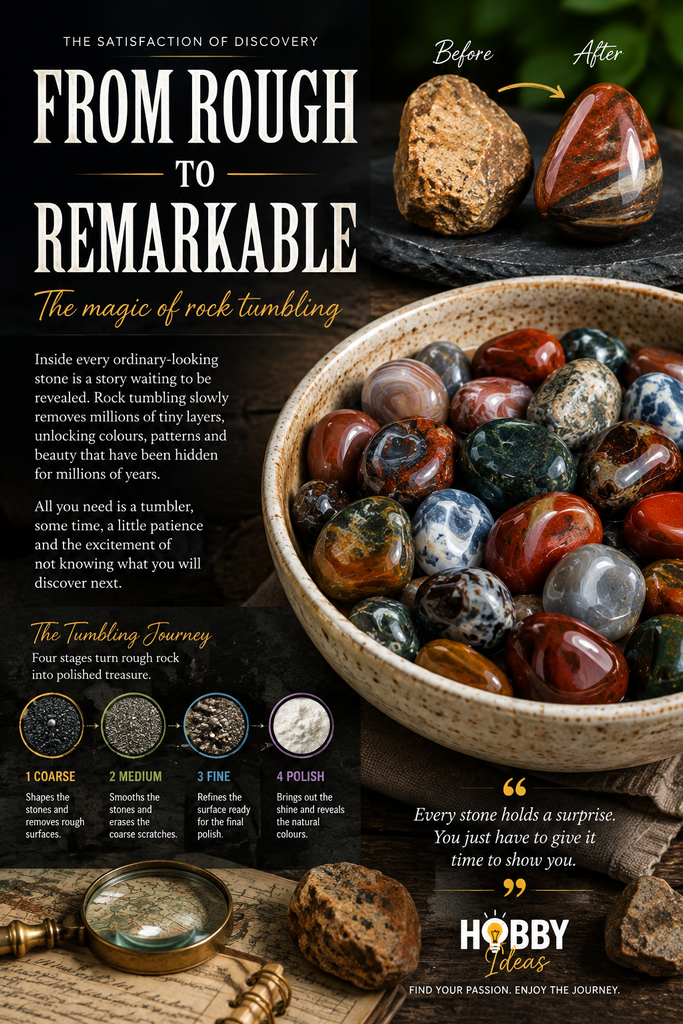
Rock tumbling for beginners starts with something wonderfully unpromising: a handful of dull, scratched and rather ordinary-looking stones. Several weeks later, those same stones can emerge smooth, richly coloured and polished enough to look as though they belong in a jewellery box.
That transformation is what makes rock tumbling so addictive. You are not painting the stones or coating them with something shiny. Instead, you slowly remove their rough surfaces until the colours and patterns hidden inside begin to appear.
The basic process is surprisingly approachable. A small rotary tumbler, suitable rocks, several grades of grit and a little patience are enough to begin.
The patience, admittedly, is non-negotiable. Rock tumbling operates on geological time compared with many hobbies. Fortunately, we are talking weeks rather than several million years.
Quick Answer: How Does Rock Tumbling Work?
Rock tumbling for beginners involves rotating rough stones inside a barrel with water and abrasive grit. Coarse grit first rounds the stones and removes rough surfaces. Finer abrasives then smooth the scratches before a final polishing stage produces the shine.
A typical batch of hard beginner-friendly stones takes around four to six weeks. However, the first shaping stage may need repeating if the rough still has sharp edges or deep imperfections.
Why Rock Tumbling Is More Interesting Than It Sounds
There is something slightly hypnotic about holding a rough stone and wondering what might be hidden beneath the surface.
A piece of jasper can initially look dusty and unremarkable. Wet it, however, and deeper reds, yellows or greens may suddenly appear. Agate can reveal bands and translucent areas that were almost invisible before polishing.
That element of discovery gives the hobby much of its appeal. You have a reasonable idea of what enters the barrel, but the finished batch still feels like an unveiling.
Rock tumbling also sits nicely between several different hobbies. There is some geology, plenty of collecting and a satisfying hands-on process. The finished stones can become display pieces, jewellery, craft materials, gifts or the beginning of a collection.
If the collecting side appeals, our guide to popular collecting hobbies explores other interests built around the pleasure of finding unusual objects.
“The tumbler does not create the beauty inside a stone. It slowly removes everything that was preventing you from seeing it.”
What Equipment Do You Need for Rock Tumbling?
The heart of rock tumbling for beginners is the tumbler itself. Beginners will usually encounter rotary and vibratory machines, but a small rotary tumbler is the simplest starting point.
A rotary tumbler has a motor-driven base and a barrel that turns continuously. Inside, the stones repeatedly slide and roll against each other. Abrasive grit gradually removes sharp edges and surface imperfections.
For beginners who would rather start with everything together, complete kits can remove some of the initial guesswork. The National Geographic Professional Rock Tumbler Kit, for example, combines a rotary tumbler with rough stones, the different stages of grit and polishing material. A kit like this also makes it easier to learn the basic process before you begin choosing your own rocks and abrasives separately.
You will also need tumbling grit. This normally progresses through increasingly fine grades before reaching the final polishing stage. For example, a complete rock polishing media refill kit can provide the different grades together, rather than buying each stage separately. Keeping the stages clearly separated also makes the process much easier to follow when you are learning.
A plastic bucket and colander are extremely useful when cleaning stones between stages. An old toothbrush helps clean the barrel, particularly around the rim and awkward corners. Safety glasses are also sensible because muddy slurry can splash when the barrel is opened.
Finally, you need rocks worth tumbling. That choice matters considerably more than many beginners expect.

Choosing the Best Rocks for a Beginner
It is tempting to gather an assortment of attractive stones, tip them into the barrel and see what happens. Unfortunately, successful rock tumbling for beginners rewards slightly more discrimination.
Jasper and agate are excellent first choices. Both are hard and durable, sitting around 7 on the Mohs hardness scale. They can also develop an impressive polish when the material is sound.
Silicified petrified wood can tumble beautifully too. Again, avoid pieces containing deep cracks, fragile areas or large cavities.
The RockTumbler.com guide to choosing tumbling rough recommends materials such as jasper and agate for beginners. Their hardness and durability make them forgiving choices for an early batch.
Try to tumble stones of similar hardness together. Hard agate and much softer material make an uneven combination. The soft pieces may lose far too much material before the harder stones are ready.
Inspect each stone closely before it goes into the barrel. Deep fractures and crumbly areas can break during tumbling. Cavities can also trap coarse grit and carry it into a later stage.
For your first batch, buying prepared tumbling rough is perfectly sensible. Finding your own rocks can become another enjoyable part of the hobby later.
If searching for geological finds appeals, you might also enjoy our guide to fossil hunting on the Norfolk coast.
Rock Tumbling for Beginners: The Four Main Stages
The process makes much more sense when you stop thinking of the tumbler as simply a polishing machine. For most of the journey, it is really a controlled grinding and smoothing machine.
Each stage removes the scratches left by the previous, coarser abrasive. Rush one stage and those imperfections simply travel onwards with the stones.
Stage One: Coarse Grit Shapes the Stones
This is where the biggest physical change happens. The rough stones go into the barrel with coarse grit and water. Always follow the quantities recommended for your particular tumbler.
Many small rotary tumblers work best when the barrel is roughly two-thirds full. The stones need enough room to tumble without simply sliding around the bottom.
The coarse abrasive removes sharp edges and uneven surfaces. With hard beginner materials, the first run commonly lasts around a week before inspection.
Do not be disappointed if the stones are not ready afterwards. The coarse stage determines their eventual shape. Repeating it often produces much better results than moving rough stones forward too soon.
Stage Two: Medium Grit Smooths the Surface
Once you are happy with the shapes, everything must be cleaned thoroughly. Medium grit should never share the barrel with remnants of the coarse stage.
This stage removes the heavier scratches created during shaping. It also begins refining the surface ready for finer abrasives.
The stones will not yet have their final shine. However, they should begin feeling noticeably smoother in your hand.
Stage Three: Fine Grit Prepares for Polish
Fine grit takes the surface another step towards its finished condition. By the end of this stage, a successful stone should feel exceptionally smooth.
Again, cleanliness matters. One piece of coarse grit introduced into a fine stage can scratch stones you have already spent weeks preparing.
A few minutes spent cleaning carefully is much less irritating than discovering a ruined polish later.
Stage Four: The Polishing Stage
Now comes the part everybody has been waiting for. Clean stones go into a meticulously cleaned barrel with the appropriate polishing compound.
After another run, suitable material should emerge with the glossy finish associated with properly tumbled stones. Colours deepen and patterns become much easier to see.
Occasionally, the least interesting stone in the original rough becomes the one everyone wants to pick up first.
Typical First Rock Tumbling Batch
Week 1–2: Coarse Grit
Coarse grit shapes the stones and removes unwanted rough areas.
Week 3: Medium Grit
Medium grit removes coarse scratches and begins smoothing the surface.
Week 4: Fine Grit
Fine grit refines the surface and prepares the stones for polishing.
Week 5: Polish
Polish develops the final lustre and reveals the finished colours and patterns.
These timings are a guide rather than a promise. Different stones, machines and starting conditions can change the process. Always judge the stones themselves before moving to the next stage.
The Cleaning Rule That Can Save an Entire Batch
If there is one habit worth developing during rock tumbling for beginners, it is obsessive cleaning between grit stages.
Coarse grit is designed to scratch rock aggressively. Polish is supposed to produce a smooth finish. Obviously, you do not want remnants of the first job turning up during the last one.
Wash the stones thoroughly and inspect cracks where abrasive might remain trapped. Clean the barrel, lid, rim and any recesses before introducing the next grade.
Keep your working area organised too. Opening several unlabelled bags of grey abrasive creates unnecessary excitement later.
Never Pour Rock Tumbling Slurry Down the Sink
This deserves its own section because it is an easy beginner mistake with potentially expensive consequences.
The muddy liquid inside a tumbler contains spent abrasive and finely ground rock. Never pour rock tumbling slurry down a sink, bath, toilet or household drain.
The mineral-rich waste can settle and harden inside plumbing. Instead, place a plastic colander over a bucket when rinsing the stones.
Catch the waste water and allow the solids to settle. Dispose of the dried material appropriately with household waste, subject to local requirements.
Keeping a dedicated bucket beside the tumbler makes this simple. It may also save you explaining your new hobby to an unimpressed plumber.
Where Should You Keep a Rock Tumbler?
A rotary tumbler runs for days rather than minutes, so location deserves some thought.
Even relatively quiet machines produce a continuous rolling or rumbling sound. A bedroom or main living room therefore tends to lose its appeal fairly quickly.
A utility area, workshop or secure hobby space often works better. Follow the manufacturer’s operating guidance and place the machine on a stable surface.
Keep the tumbler away from young children and pets. Check it regularly for leaks, movement or unusual noises, particularly with a new machine.
You should also avoid breathing dust from dry grit or rock material. Handle abrasives carefully and follow the safety instructions supplied with each product.
Why Didn’t My Tumbled Rocks Turn Shiny?
Opening a final barrel and finding disappointingly dull stones is almost a rock tumbling for beginners rite of passage. Fortunately, the machine is rarely plotting against you.
The starting material may simply have been unsuitable. Some rocks polish beautifully while others do not.
Mixed hardnesses can also create problems because softer stones wear differently from harder material.
Moving out of coarse grit too soon is another common mistake. Polish cannot hide deep pits and scratches that should have disappeared weeks earlier.
Contamination between stages can undo good work too. Even small amounts of coarser abrasive can introduce new scratches during the fine or polishing stages.
Finally, resist experimenting too much with the first batch. Learn the standard process before trying unusual materials or mysterious internet recipes involving substances normally found beneath the kitchen sink.
“Good rock tumbling rewards patience twice: first while you wait, and again when you finally open the barrel.”
What Can You Do With Tumbled Stones?
The first polished batch usually spends quite a lot of time being picked up and admired under different lights. Eventually, however, you may wonder what to do with the growing collection.
Beautiful examples can simply be displayed in bowls, trays or small cabinets. Others make attractive gifts, particularly when you know where the original rough was found.
Tumbled stones can also become pendants, wire-wrapped jewellery, keyrings or craft decorations. Children often enjoy creating labelled collections too.
There is no requirement to make anything from them. Learning to recognise different materials and gradually building a collection is satisfying in its own right.
Finding Your Own Rocks to Tumble
Once you have successfully polished bought rough, finding potential tumbling material outdoors adds another dimension to the hobby.
Beaches and other stony areas can provide fascinating material, but collecting rules vary. Some locations prohibit removing rocks, fossils or geological material. Once you begin bringing home potential tumbling material, learning to identify what you have found becomes part of the fun. A photographic reference such as The Illustrated Guide to Rocks & Minerals can help with recognising specimens and understanding their characteristics, while also opening the door to rock and mineral collecting as a hobby in its own right.
Always check the rules for the exact place you intend to visit. Obtain permission before collecting on private land.
Never hammer rock faces or remove material where doing so is prohibited or could cause damage.
For more hobbies that turn an ordinary walk into a search for something interesting, see our guide to unusual hobby ideas in the UK.
How Much Does Rock Tumbling Cost?
Rock tumbling for beginners is not the cheapest hobby to start because you need a machine and consumable abrasives.
However, the tumbler itself is reusable and can provide years of experimentation. Grit and polish are the main ongoing costs because they are consumed during each batch.
You should also remember that a rotary tumbler runs continuously for long periods, so electricity forms part of the real cost.
There is no reason to begin with a large professional machine. A modest rotary tumbler and good beginner rough will teach you far more than an elaborate setup.
Once you have seen a rough piece of jasper become smooth and richly coloured, the attraction suddenly makes complete sense.
Rock Tumbling for Beginners: Your First Batch
Keep your first attempt deliberately uncomplicated. Choose good-quality jasper or agate with broadly similar hardness and suitable sizes.
Read the instructions for your machine before loading it. Barrel capacities and recommended quantities vary between manufacturers.
Run the coarse stage and inspect every stone before moving forward. If a stone still has sharp edges or unwanted rough areas, give it more time.
Clean everything thoroughly before every change of grit. Keep a simple notebook recording the material, grit, start date and results.
Those notes become surprisingly useful once you begin experimenting with different rocks.
Most importantly, do not rush because the stones have already spent a week making a gentle rumbling noise in the corner.
The tumbler does the physical work. Your job is to provide good material, maintain the process and recognise when the stones are ready.
Rock Tumbling for Beginners: Frequently Asked Questions
How long does rock tumbling take?
A typical batch of hard beginner-friendly stones can take around four to six weeks. The coarse shaping stage may need repeating.
What are the best rocks for a beginner to tumble?
Jasper and agate are excellent beginner choices because they are durable and capable of taking a strong polish. Suitable petrified wood can also work well.
Can I put any stones in a rock tumbler?
No. Stones vary greatly in hardness and durability. Soft, fractured, porous or crumbly material may perform badly during tumbling.
Why should rocks of similar hardness be tumbled together?
Stones of similar hardness tend to grind and smooth at comparable rates. Softer material may disappear too quickly beside much harder stones.
Can I pour rock tumbler water down the drain?
No. Used grit and finely ground rock can settle and harden inside plumbing. Catch the slurry in a bucket instead.
Is rock tumbling noisy?
Rotary tumblers make a continuous rolling sound. A utility room, workshop or dedicated hobby area is usually more suitable than a bedroom.
Final Thoughts: Is Rock Tumbling Worth Trying?
Rock tumbling is a wonderfully unfashionable hobby in the best possible way. Nothing happens instantly, and there is very little reason to stare at a screen.
Instead, a barrel quietly turns while abrasive, water and time do their work. Then comes the good bit.
You open the barrel, rinse away the grey slurry and discover that the dull stones have changed. Patterns appear, colours deepen and the surfaces become wonderfully smooth.
Occasionally, a stone you barely noticed at the beginning becomes the best one in the batch.
That mixture of anticipation, geology and transformation makes rock tumbling for beginners so satisfying.
Start with good material, keep everything clean and give every stage the time it needs. Above all, resist the urge to rush.
After all, the rocks have already waited a few million years. Another week probably will not hurt them.
Affiliate Disclosure: Hobby Ideas may earn a small commission from qualifying purchases made through links in this article, at no extra cost to you. We only recommend products or resources that we believe are relevant and useful to our readers.